
Complete step by step “How-to” guide for building a dry-stack stone wall.
Dry stone retaining walls add beauty and enhance the value of your property as well as retain slopes to add useable level ground. The design and construction of dry stone walls are projects that can be undertaken by most homeowners with great success.
Wall Construction Tips
When designing any wall, it always helps to position the wall in the middle of the slope. This gives an equal amount of soil removed that will be needed as backfill (See Fig. 1).

Fig 1
On uneven grades, the contour should be taken from the bottom of the wall while all courses are laid flat creating a wall of varying heights with a level top (See Fig. 2).

Fig 2
All dry stone walls should be constructed with the thickness equal to one half of the overall height. Walls should be built leaning back toward the slope about 2 inches per foot of height for stability (See Fig. 3).
For walls that exceed 2-1/2 feet in height, the use of bonding stones and a drainage system are necessary for long-term stability. Bonding stones stabilize a wall and connect it to the slope that is being retained. Drainage behind any retaining wall of size is critical. Hydraulic pressure is responsible for the failure of most walls. To incorporate a drainage system in your wall, leave a 12-inch wide space behind the wall and lay a 4-inch perforated drainage pipe at the bottom and backfill with clean aggregate. Separate the drainage system from the slope with a layer of landscape fabric, which will stop soil intrusion (See Fig. 4).
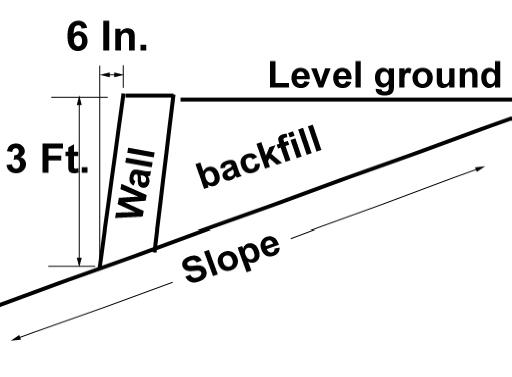
Fig 3
The drainpipe can be directed to a lower area away from the wall, reducing the chances of erosion.
To incorporate a drainage system in your wall, leave a 12-inch wide space behind the wall and lay a 4-inch perforated drainage pipe at the bottom and backfill with clean aggregate. Separate the drainage system from the slope with a layer of landscape fabric, which will stop soil intrusion (See Fig. 4).

Fig 4
The drainpipe can be directed to a lower area away from the wall, reducing the chances of erosion.
For dry stone walls 2-1/2 Feet and under, elaborate drain systems are not necessary, although landscape fabric is still necessary to stop soil on the slope from washing through the wall creating erosion above and behind the wall. Bonding stones should still be used for structural integrity.
Tools needed
• Shovel
• Small sledgehammer
• String
• String Level
• Stakes to hold string
• Hand tamper
• Safety glasses
• Tape measure
• Builders level
Materials needed
• Stone
• Landscape fabric
• For walls more than 2-1/2 Feet tall:
Add aggregate and 4” drainpipe
Terms To Know
Base stones:
The broadest and thickest stones used to make the first course or the foundation of a dry stone
wall.
Bonding stones:
Longer stones turned to run from the front face of a wall through the wall and protrude out the back of the wall into the backfill material. These stones add structural as well as lateral strength to a wall.
Course: A continuous horizontal layer of stone that maintains a constant level height.
Hydraulic pressure: The lateral force created by water when its natural flow is slowed or stopped.
Cap stone: Uniform sized stones used as the top course on a wall.
Shim stone: A small and/or thin stone used to level and stabilize other stones in a wall.
Calculate Materials Needed
Stone:
Determine the length, width and height of the wall in feet. Average the width and the height if they are not consistent. Multiply the length x width x height to get the cubic footage. There are about 15 cubic feet in one ton of stone so divide the cubic footage of your wall by 15 to determine the quantity of stone needed in tons.
EXAMPLE:
A 20′ long wall that is 2′ tall needs to be 1′ wide.
20′ x 1′ x 2′ = 40 cubic feet
40 divided by 15 = 2.67 tons
Landscape fabric:
Take the height of the wall and add 1.5 feet then multiply by the length of the wall to attain square footage.
EXAMPLE:
20′(2′ +1.5′) = 70 square feet.
Drainage aggregate:
Assuming a 12″ wide drainage system. Multiply the length of the wall by the width of the drainage aggregate
by the height of the wall to get the cubic footage. There are 27 cubic feet in one cubic yard so divide the
cubic footage by 27 to get the quantity of cubic yards of drainage aggregate needed.
EXAMPLE:
20′ x 1′ x 2′ = 40 cubic feet
40 divided by 27 = 1.5 cubic yards
Drainpipe:
The length of the drain system behind the wall for perforated pipe and the distance to the drain area in
solid drainpipe if draining elsewhere.
Backfill material:
Multiply the length x width x depth of the area to be filled to attain the cubic footage. Divide the cubic
footage by 27 to get the quantity of cubic yards needed. Note: Soils will compact up to 20 percent so a little
extra may be necessary.
Getting Started
Dig a level bottom trench wide enough for the base stones to fit into and about the same depth, as they are
thick, then compact the bottom with a hand tamper. Set stakes outside of the wall ends so a string can be tied on and leveled with a string level above the walls maximum height. Lay landscape fabric covering one half of the base trench and extending back toward the slope.
Determine the lowest point of the trench by measuring down from the string. Pick out the base stones and begin laying at the lowest point of the trench in both directions covering the landscape fabric to hold it in place. The base course must be level and firmly installed so use shim stones to help fill in voids and level individual stones as needed. If shim and filler stones are in short supply, break up some whole stones with a sledgehammer. We are definitely not building a piano here. The correct attitude for building a dry stone wall is “If you can’t force it, break it. If you can’t break it, your hammer is most definitely too small!


If the base course fades below the intended grade too far, go back to where you started and begin the next
course. Overlap the joints that are between the stones below, and span the width of the wall with bonding
stones as often as possible. Continue this process until the base course is complete (See Fig. 5).
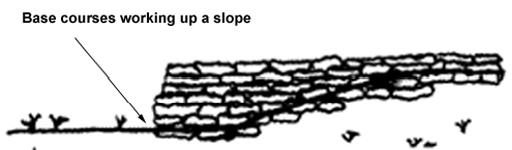
Fig 5
Each course of stone should be stepping back slightly to achieve a two-inch per foot lean back toward the
slope. This helps the wall retain the slope. Use a builders level and tape measure to check your step back.
While stacking the courses, lay the landscape fabric tight up against the back of the wall and install and
compact the backfill as you go. For larger walls add the drainage aggregate, the pipe, and the backfill as you go while keeping the aggregate separated from the backfill with the landscape fabric.
For walls more than two and one half feet tall, install bonding stones every 18″ of height about four to six
feet apart. Uniform thickness stones should be saved for the cap course. Level the wall before installing the cap course and lap the landscape fabric over the top of the wall, then trim off excess until it covers half of the top of the wall.
Install the cap course tightly to hold down and hide the landscape fabric. If the wall will be in a public area or will be used as a sitting wall, the cap course should be mortared down or glued down with a construction
adhesive suitable for masonry.